Showing posts with label painting. Show all posts

Friday, February 20, 2015

Painted Wicker Basket

We've had this wicker laundry basket for 7 years now and it has served us well. The cracks are starting to show but we're not ready to give up on it yet. I painted it recently so that I can still get a little more milage out of it.

Because of the cracks in the wood, the spray paint couldn't give me a smooth finish. Also, the paint tends to drip over the rounded wooden segments so I had to make sure that the inside and outside colours match up.

I first cleaned it and let it dry for a full day. Then I first spray painted the inside in grey. I gave it an hour between each coat.

For the outside, I tried using masking tape to separate the colours, but because of the gap between the segments, colours tended to flow. So I just stuck to spraying from 4 inches away which gave me good enough control to not go (too much) over the line.

I've used white, metallic grey (on the inside and edges), and gold (which looks much like the original colour), and it is back in service.


Monday, August 25, 2014

Monumental Paris - Pantheon and Arc de Triomphe

Paris is filled to the brim with monuments of historical and/or artistic importance. It is difficult to walk 2 steps without stumbling upon one. The Pantheon is one such imposing structure we couldn't miss. Even as you stand outside and look at this impressive structure, you can't help but also admire the beauty of the surrounding buildings and roads.

There was some restoration work going on but thankfully, none of the sections inside were closed or covered in scaffolding. 


Before you even enter, you have to stop and take in the grand entrance with it's intimidating columns and sculpted designs. The relief on the pediment is inscribed with the motto: Aux grands hommes, la patrie reconnaissante (To great men, the grateful homeland) which is in reference to the great French personalities interred in the crypts below.

The first look surprises you because you wouldn't have though it would be so spacious and grand going by the façade. The triple dome holds you in awe till you manage to take your eyes from it and explore the other treasures here.

There are many sculptures, each with its historical significance, such as the tribute to the orators and statesmen for their contribution to the Battle of Valmy that was one of the most significant battles during the Revolution in 1792. It was sculpted by Laurent Marqueste in 1903 and the group of speakers and publicists of the Restoration is composed of Benjamin Constant, Count Pierre Serre, Casimir Perrier, Armand Carrel, General Maximilien Foy, Jacques-Antoine Manuel, the Vicomte François-René de Chateaubriand.


The centrepiece is “The National Convention” by Francois Leon-Sicard done in 1920. It features soldiers on the right of Marianne, the symbol of France, and members of the National Convention on the left. Above in the half dome (done 1874 to 1885) by Ernest Hebert is Christ teaching the angel of France with St Genevieve and Joan d'Arc to the left and the City of Paris kneeling to the right.


There are also many impressive murals on the walls like the one by Jules Eugène Lenepveu depicting the significant moments in the life of Joan of Arc. It is actually a set of four 15 feet high panels, and four other smaller paintings.


As mentioned above, the Pantheon also houses a crypt with the who's who of France's elite. Voltaire (pictured above), Rousseau, Louis Braille, and Victor Hugo to name a few...you are in esteemed company

Of course, no visit to Paris is complete without visiting the iconic Arc de Triomphe. It is in the centre of a beautifully laid out crossroads with roads leading to it from all directions like a 12-pronged star. This makes it is a bit of a challenge to cross the road here with the absence of a traffic signal. We didn't go up to the viewing platform or the museum, but sat near one of the pillars and took in this magnificent city on a delightful summer's evening.


Monday, June 9, 2014

Palace Turned Art Mecca - The Louvre

Art and it's history is always fascinating and till now I've only seen it on a screen. I didn't realise what I was missing. Seeing these treasure first hand is something that cannot be replicated by any screen or poster print. After all these years, the paintings seem to have a life of their own and the more you look at them, the more they surprise you. The sculptures have to be seen to be believed. Cold, hard marble seems like a fluffy pillow or a delicate fabric, and statues look almost life-life if it wasn't for the lack of colour on it.

We had to wait over an hour in line to get in the pyramid - we didn't want to get a pre-paid museum pass because we knew this would be the only place we'd use it so it didn't make sense. If it wasn't scorching hot, we would've relaxed by the fountains but there was also too much ground to cover.

Just as you enter the complex you realize the enormity of what lays ahead. There is no way you can cover the whole place in a day, so don't even try. The overcrowding and limited time prevented us from enjoying every work of art. But how amazing it would be to live here and visit it at leisure to take in the beauty and history of all the pieces on display?

The Mona Lisa was a let down. Because of the barricades, you can't get near it for a clear view, and all the pushing and shoving in the overcrowded viewing area makes you beat a hasty retreat.

Apart from the artefacts, the palace itself is a sight to behold - the architecture, paintings on the ceilings, carved interiors - you need to keep swivelling your head all the way around to not miss anything.

Highlights:
- Marble sculptures - Venus de Milo, Michaelangelo's Slaves, Winged Victory, Sleeping Hermaphrodite, Cupid's Kiss
- Paintings - Portraits (like the very cute Monsieur Vallet by Pierre-Paul Prud'Hon), Sauvage's 3-D painting of Bacchanalia, Napoleon's Coronation
- Artefacts - The Islamic Art Collection, the Sphinx
- Architecture - The Henri II Staircase, Medieval Louvre


Monday, February 24, 2014

Venturing Out

Some people are their own harshest critics. It is one of the reasons I never thought of selling stuff I make - art or food. There are people with much better work out there. But since friends and family have been insisting that it is good enough to sell, I thought why not take a chance. With that I started a Facebook store called Happy Dog Designs of some of my artwork. And if it doesn't work, I can always say "I told you so"!


Friday, November 29, 2013

Ganesh on the Wall

My sister-in-law wanted a Ganesh painting for her wall. Instead of painting one big Ganesh I decided on doing a set of four. One reason being it was hard for me to choose just one design out of the million; second reason being it is just very difficult for me to manage one big painting because I lose patience fast; and lastly, it's easier to carry on flight.

I had just a week to finish them so I did some preliminary sketches and went to the hobby store, stacked up on acrylic paints and rushed home - only to find that the gold and silver bottles I picked up were powdered pigments and I needed a medium. But they didn't have any at the store! The Internet didn't give me any helpful alternatives either. Since we were travelling to meet some people on the other side of town, I checked their other branch if they had any - thankfully they did.

I had to use 2-3 coats of colour to get some consistency in the paintings. They seemed very diluted on their own. 

For the silver Ganesh, I wanted to use the silver powder to highlight the edges but the wind blew and scattered the pigment a little. It seemed to work so that's what I did on purpose - just dabbed a little powder on the edges then blew lightly in the direction I wanted the powder to scatter. It would be better to do this in parts to avoid a mess.

My metallic pens from my previous projects came in very handy to discreetly outline the edges of the drawings after the colours had been filled in. I thought about doing some detailed Zentangles over the images but then opted to keep it clean and simple. 


Tuesday, November 12, 2013

Drawings

I have fallen behind on my little Zentangle notebook that I tried to scribble in everyday, mainly because I've been travelling, and also because I was working on a bigger scale. These are some of the sets I made last month.

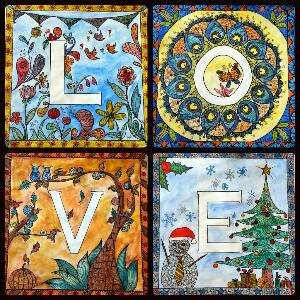
The first one took me over a day for each letter (10x10 inches each). I had to pencil in the dimensions for the borders and letters for uniformity, otherwise I prefer freehand. The next step was to watercolour it. I have to admit that I was disappointed with the way it looked with just the watercolours and I thought I have wasted a whole lot of time for nothing. But when I outlines it with my micron pens, it started to really stand out. Phew!

The animal set just started out as a trial with the peacock, but I liked the owl I saw somewhere so that came next. But just two seemed incomplete, so I found a curious giraffe. I made this on thick printing paper so the pens were gliding on them as opposed to the watercolour paper I used for the previous one.

The other two pieces were also experiments. I had some good art paper but were too dark for the micron pens. Even the metallic ones I got didn't stand out too well. So I used watercolour to lighten the background, then used the pens for the design. These are all freehand therefor not too straight at the borders.

Love for All Seasons (watercolour on paper, with coloured pencils and pens)

Animal Kingdom (Coloured pencils on paper)

Joy & Freedom (Watercolours and metallic markers on paper)

Floating in Space (watercolour and metallic markers on paper)

Sunday, September 29, 2013

Antler Project

Deer shed their antlers or lose them in territorial fights so it is quite common to find one lying around where there are herds of them.

This particular one had been at my parents' home for a decade and when I brought it home I felt that the natural tone just blended in and wasn't noticeable. It needed some punch. After a quick browsing of colour palettes, I settled on Payne's grey, magenta, and gold in acrylic. I found bottled colours easier to apply than spray paint. 

I used masking tape to demarcate the colours but because of the ridges on the antler there were small gaps because of which some colour leaked through. Don't worry too much. After the paint dries, just touch up the lines with a fine brush. I used 3 to 4 coats of paint. Remember to wait overnight for the paint to dry before removing the tape and applying it to another painted area.

Thursday, July 11, 2013

Things to do on a Rainy Day - Painted Ceramics

I had been wanting to learn pottery for a while now, but as soon as I could find the time, the pottery class went under renovation. I found the next best thing though - ceramic painting.

A hobby store - Hobby Ideas - has pre-formed ceramic items that you can paint. Once you're done colouring, they bake it for you. 

I picked up 2 coffee mugs to paint (for Rs. 800 each that includes clolours and baking). I choose coffee mugs on the basis of their handles, and this one was comfortable to hold. But I didn't have time to sit in-store to complete my project so I took it home along with some ceramic paint.

At home, I realised that if I had planned my design in advance, I would have a better selection of colours instead of the random ones I picked up. But I made do with what I had. 

For the yellow mug, I outlined the design with a pencil, but it was hard to blend the lines in with colour. So the blue one which I did next was completely freehand. I painted two coats of colour hoping to avoid brush marks, but it didn't help much. The finished colouring is much deeper that it was pre-baking.

They say that these hand-painted items shouldn't be washed in a dishwasher, but I did and the colour seems to hold fine.

My mornings with my coffee just got brighter!

Sunday, July 7, 2013

This Week in Zentangle

I've been doodling almost everyday with my new pens and new journal. I try to not look at designs on the Internet, but I find myself repeating some of the patterns I already know. I've been making an effort to come up with variations on my own. It works most of the times, but sometimes it doesn't match up to the expectations. Live and learn!

UPDATE: With my new pens and journal, I've gone on a One-Zentangle-a-Day spree. Instead of uploading the images here every week, I've pinned them on Pinterest. Some even in colour.


Friday, June 28, 2013

Zentangle Upgrade

I had been using a regular gel pen for my Zentangles previously, and although it was alright for larger patterns, it didn't do too well for detailed work. It also didn't give smooth, even lines.

Recently a friend recommended micro tip pens and it has made all the difference. The different sized tips make it easy for detailed drawings and for filling in spaces. It is much more stable and even. They also come in coloured inks - I plan to get them once I enter Phase III.


UPDATE: I made a kitty sister poster as well.

Sunday, April 14, 2013

All you need is love

Finally made a coloured Zentangle and moved on from the small squares. Rummy and Bing make an appearance as well.

UPDATE: Framed at it's new home!

Sunday, December 16, 2012

Greetings for the new year

It's been so long that someone has sent an actual letter or postcard, that I felt I should send something out myself! I remember the excitement of getting mail in the mailbox, with cursive writing, maybe a little drawing at the side, and some doodles on fancy letter paper. Emails are a great way to keep in touch, but nothing beats the rare letter or greeting.


UPDATE: